Wednesday, October 24, 2007

Back for a Visit


Well, just to let y'all know, I am very much enjoying my E320 CDI and its 369 lb.ft. of torque available at 1800-2600 RPM :) It's scary fast for a diesel. 1/4 mile in 15.3 sec @ 91 mph. Not bad for a 4000 lb. car.

Sunday, April 01, 2007

On The Road Again

After having a valve job and head welding/resurfacing, SoDak is back on the road! When Stew pulled the head he noticed that the pistons don't clear the top of the engine block at TDC. This is a bit odd, but everything runs well. He also discovered that the air intake thermostat that is supposed to automatically select for preheated air/ambient air was stuck in the preheated air setting so SoDak was continually sucking hot air into the intake from near the exhaust manifolds. This would have lead to a decrease in fuel economy and is generally not good for the engine.

Friday, March 09, 2007

Head

Today the head comes off of SoDak and goes to the machine shop for inspection.

Friday, February 16, 2007

SoDak Update

"SoDak was hydro locked when I tried to start it, so it seemed obvious that I was going to have to do something with the head gasket. Then I decided to check the head bolts for tightness. They were loose, but also felt crunchy when turning. After tweaking them, the leak stopped. So I decided to pull them out and clean up the threads in the block and properly tighten them. Well, this only worked for the first one. The second one came out all corroded and badly necked.I am still considering jumping into a valve job--I really should. But at this point, I think I will just put in new bolts, clean the threads, and see what happens. It is considerably more work to do a valve job, so I hope to avoid that for now. I will let you know how it goes"

STEW

Thursday, February 15, 2007

Don't Worry!

OK, don't worry about the BLOG going anywhere. Part of the deal with my friend STEW is that he would keep up the BLOG. It won't go anywhere and it will still be updated, and this time by a professional mechanic, not some schmuck wanna-be like me :)

Tuesday, February 13, 2007

SOLD! To the Highest Bidder

Today I sold SoDak to my good friend Stew. He will fix the headgasket and we'll see what the future holds. I decided that, with my wife working now, and me working, that I could only afford one project car. That one car would be our 1978 VW Westfalia that needs an engine rebuild an a transmission rebuild. Our plan is to hit the road in the bus in 3 years from now. My wife can bike to work so we only need one car, our VW Bora (Jetta). As sad as I am to see her go, SoDak is going to a very good home.

Monday, January 22, 2007

Bad Dreams

I had a dream last night. I had parked SoDak in a light industrial area by a scrap yard. This was so it was out of the way until I had time to fix it. When I came back a month later, someone had taken the hood, fuel pump, injectors, head, turbo, etc. I was furious, but sort of relieved because I didn't have to fix it.

Sunday, January 21, 2007

Headgasket

Well, looks like SoDak has a blown headgasket. Someone, who shall remain nameless, drove the car for an unknown period of time "in the red" on the temperature gauge about a month ago. I thought it would be OK, but evidently it is not. Symptoms...
  • When starting the car, coolant reservoir pressurizes even though the car is not warmed up.
  • Loss of coolant with no coolant leaks
  • Difficulty starting (it still starts at -5 F with no block heater)
  • Faint odor of ethylene glycol (coolant) in the exhaust
  • More white smoke out the tailpipe that usual
  • RPM-dependent heater output (my guess is that combustion gases are entering the cooling system and preventing it from functioning normally)
  • Periodic slight increases in coolant temperature (temp has always been rock-steady, again, gas pockets in the cooling system preventing proper cooling)

The definitive test for a blown head gasket is to test for hydrcarbons in the coolant reservoir using an exhause gas analyzer. Notice that coolant/oil mixing is nowhere on the list. Coolant oil mixing is NOT diagnostic of a blown headgasket as the oil cooler on this vehicle is liquid-cooled and is part of the oil filter assembly. The owner before the owner before me (a professional Volvo mechanic from Sweden no less) tore off the head to repair a "head gasket" and found that it was just fine and that the oil cooler had failed, a very unfortunate mistake...

Tuesday, January 16, 2007

Heat Contd.

I pulled both of the heater hoses off of the firewall (after I clamped off the hoses). These go straight into the heater core. I shoved a hose in there and flushed it completely, from both directions. Water flowed freely. This meant that I did not have an issue with the valve or the vacuum switch or blockage in the core. I hooked it back up and "bled" the cooling system (to get out any air bubbles). It seems to work much better now, but heat is still somewhat dependent on engine RPM. Possibly I need to replace the thermostat. It may be stuck. We'll see how it runs this week.

Sunday, January 14, 2007

The Heat is On (well, actually it's off...)

I appear to have lost about 90% of the heat in SoDak, just in time for winter finally showing up! The problem is most likely one of three things.
  • Water valve (allows coolant into the heater core)
  • Water valve vacuum switch (uses vacuum to open water valve)
  • Heater core (the water to air heat exchanger)

It is unlikely that the problem is the heater core as this problem came up rather suddenly. Fortunately, I have Martin Luther King Jr. Day off school and will spend it at The Foreign Service trying to get heat.

Wednesday, January 10, 2007

Dave's Volvo


Well, SoDak just keeps on chugging along so I guess I have to live vicariously through other Volvo owners. Dave is rebuilding his D24T and is looking for some serious power... He used a stock headgasket and stock headbolts. I'm very jealous of his squeaky clean block. Here it is with its guts removed. And now they're back in!

Something I definitely don't have the courage to do- take apart my turbocharger...

He's shooting for 140 hp :)

Tuesday, November 28, 2006

Parts I Need


1. Throttle mechanism
2. 7-series turbo boost gauges from instrument cluster w/square black plastic mounting plate

Thursday, October 19, 2006

Tint


I was pulled over today in Roseville. The reason: the tint on my windows was too dark. Please. You have nothing better to do? Fortunately, the officer saw my driving record and decided to let me go without so much as a "fix-it" ticket. The interesting thing was that the officer had a "Tint Meter Enforcer". HA! Anyway, Minnesota requires that a minimum of 50% light be transmitted through the window. The Volvo had a reading of 17% :) The interesting thing is that tint laws do not apply to trucks or SUV's. What rubbish. Here is a link to window tint laws by state in case you were wondering. I bought the car in South Dakota and it was originally from Florida. Here are instructions on how to remove your window tint.

Tuesday, October 03, 2006

Another Turbodiesel In Town

This had to be the saddest looking volvo I have ever seen. Smashed in driver's front corner, primered hood, smashed grill and headlight. It was a quite a sight. Late 20's white male driver with a cast on his left arm. No issues with SoDak. Fuel economy does not appear to be better with the advanced injection values. Still 30mpg Hwy/City.

Tuesday, September 19, 2006

Hoses & Hitches

I changed the last two hoses on the motor that hadn't been done yet. The one from the block to the metal tube in between the head and the intake manifold (runs to the oil cooler) sprung a leak. I replaced the heater hose at the firewall while I was doing the job. Unfortunately, the leak happened when my wife was driving down in Mankato to her symphony rehearsal so I had to drive 1.5 hours down there, fix it (I had the new hoses in the trunk) and then drive back. Luckily it happened in Mankato and not on the freeway. I also noticed the boost pressure to fuel pump hose had come off. The car was WAY peppy when I put it back on.

This weekend I hauled a cord of oak hoem for the wood burning stove. I learned a bit about hitches trying to figure out if it was wise to tow this much with the Volvo. the Volvo will tow 3300 lb. SoDak has a Class II hitch, which is rated to 3500 lb. I figured there are safely allowances (no passengers) so I could safely tow 3700 lbs., the approximate weight of a cord of oak. No problem. What an awesome utility vehicle!

Monday, September 11, 2006

0.95mm

Well, 0.95 is where it's at as far as timing goes. MUCH more power. Should have absolutely no problem starting in the winter as the cold start device advances the timing an additional 0.25mm. Last winter it started great w/o a block heater down to -10F aT 0.85MM. I tried it on straight petro diesel and B50 and it's much more "zippy" with the advanced timing. If you really want, you could push it to 0.98mm, but I'm conservative. I am, afterall, a volvo driver... :)

Saturday, September 02, 2006

This Has to be one of the Funniest Ad's I Have Ever Seen...

Here Be sure to read the WHOLE thing or you may miss some laughs, e.g. under "Exterior Options", Alloy Wheels, Tow Bar, Scrapes and Dents :)

Monday, August 28, 2006

More Pump Timing and Fuel Economy

Upon recommendation from a reputable source, I'm going to try timing SoDak at 0.95mm and let y'all know what I think. This is quite a bit higher that the 0.75mm spec and just a bit higher than the 0.92mm spec'd for non-US cars. the car's a bit lethargic at 0.75mm, in my humble opinion.

My friend bought the universal cam holding tool mentioned below. I timed the injection by rotating the cam sprocket and not moving the pump (a HUGE pain in the buttocks). First check your timing as described earlier in this BLOG. Next roll the engine over again to TDC, back it up until you get your lowest dial reading (should be zero from checking the timing). Then you loosen the rear cam sprocket, effectively disengaging the cam from the pump. If you want to add timing, say 0.2mm in my case, you roll the pump forward 0.2mm holding the cam sprocket (or use the cam holding tool). The camshaft will not move, only the sprocket. The rear sprocket has no woodruff key so it is free to rotate. Then you retighten the cam sprocket and recheck the timing. It's that simple. You need to make sure you don't turn the injection pump while you tighten the cam sprocket bolt, but you can just look at the dial indicator to make sure. Worked like a charm!

FYI the EPA fuel economy specs for the 1985 740TD w/auto are 25 city, 30 hwy. I get 30 hwy/city. It should improve with the 0.95mm setting.

Flat

Having never had a flat in my life, I had two this week, one one on the Jetta and one on SoDak. Now I always check the pressure in my spare tire when I check my other tires (I highly recommend you do this). The spare was great. The jack is the easiest of any I've ever used. There was, however, one small problem. No lug wrench. Aargh. All I had with me was a crescent wrench. Luckily I had my bike in the back and rode to the nearest repair station, left my wallet in exchange for a 17mm deep well 1/2" drive and I was on the road in no time flat (pun intended). Strangely, the valve stem had a tear in it!? That was kind of an odd flat, but better than having to plug the tire.

Lessons
  • Make sure you have ALL of your tool kit
  • Drive no more than absolutely necessary on a flat tire. You may be able to save it
  • Replace your valve stems when getting new tires

Sunday, August 20, 2006

Free Biodiesel Helpline!


You can thank my tax dollars for a free University of Minnesota Center for Diesel Research Biodiesel helpline. They will answer questions related to "biodiesel fuel use, storage, availability, or other questions." I haven't called yet, but here's the number 1-800-929-3437

Saturday, August 19, 2006

Another Trip to the Junk Yard


I returned to U-Pull-R parts in Rosemount to find a plethora of 7-series Volvos. I scored 3 14" Alloy wheels for $22 each. Very nice-no curb rash. I just need one more to make a summer set of wheels, but I can deal with swapping one tire.

It seems as if I missed out on a 240 turbo- a source of boost, Volts, etc. VDO gauges with Volvo printed on them. All the 740's had had their instrument clusters removed :( The turbo models have extra gauges that can be easily transplanted into my dash right above the fuel and temperature gauges, plus my clock has a busted plastic gear so I can't change the time.

There were quite a bit of interior pieces to be had, but none for the wagon. Better luck next time? I got the 740 part of the 740 GLE script for the rear liftgate. Anyone have the GLE?

Tuesday, August 15, 2006

Front Strut Inserts


It's finally time to do the front strut inserts. The struts have basically NO damping whatsoever. I went with Bilstein inserts. Around $50 wholesale. I'm off to put them in this afternoon! You'll need a spring compressor to do the job.

HA! You might also need an oxy/acetylene torch, an air hammer, a chain wrench, a pipe wrench and a LOT of patience. The nut that holds in the strut insert(picture above at right) is a bear to get off. I had to heat up the nut and strut housing and then airhammer it loose while hot. The threads will need some attention before the new struts go in.

Day 2.... Well the strut nut on the other side was a piece of cake. Some items that may need attention are the rubber bump stops (Volvo p/n 1273849). Mine had completely disintigrated. Also make sure you have both plastic accordian shock bellows (picture, Volvo p/n 1387735). I was missing one. All these parts delays are starting to get annoying, but I should have checked these thigns beforehand :/ There is a strut bearing (allows the strut to pivot against the vehicle body) that should be cleaned and repacked with bearing grease. It has a plastic casing, half yellow/orange, half gray, that can be easily pried apart to get at the bearings. (picture at right)

Day 3... Finally complete! FYI, this job can be done on the car. Disconnect the sway bar and tie rod end from the strut and the strut will then drop out of the wheel well. BE CAREFUL NOT TO STRESS THE BRAKE HOSES. Once the strut is free of the wheel well, use the spring compressor.

Sunday, August 13, 2006

Another Biodiesel Rant

So I have been getting myself all worked up about the fact that SoDak was still not starting well cold. It would chuggaluggakathunkathunkawaddadatablatatatatatatatatatatatatata and then run just fine. Alot of white smoke came out in the process. Turns out the batch of batch of biodiesel I had was at fault. 1/2 a tank of petro diesel and she's starting perfectly cold. In addition, the VW Jetta TDI was running sluggishly. A couple gallons of pertro diesel and she's MUCH more peppy. I don't know what these morons are doing. Get the kinks worked out before you subject us all to your sophomoric chemistry experiments. University of Minnesota professor Dr. David Kittelson recommended that I run a max of B20. I'm inclined to follow his recommendations to avoid future problems. As much as this pains me, unless you're making B100 yourself, I'd recommend following his advice as well.

Saturday, August 12, 2006

A few notes on pump R&R and Smoke

After seeing a VW 1.8T timing belt that had almost shredded itself due to a bad water pump sprocket bushing, the importance of lining up the pump sprocket and the camshaft sprocket comes to mind. Line up a straight-edge with the camshaft sprocket. it should line up perfectly with the pump sprocket. This is only really necessary if you remove the pump mounting bracket or if your rear belt seems to be wearing prematurely/unevenly.

Regarding the smoke... I seem unable to get the Volvo to smoke even if I mash down the throttle and am running petro diesel. This is a good thing. It might be due to the new pump timing setting (0.75mm), injector recalibration (155 bar) or the rebuilt pump or a combination of the former. Whatever it is, it's good news.

Monday, August 07, 2006

Pump Timing Values & Return Lines


It turns out that I mistakedly set my pump timing to 0.44mm instead of the 0.75mm specified by Volvo for engines with an EGR system. This caused a bit of hard starting/rough running cold. The also increased cranking time when warm. I used to be able to just blip the key and she'd start. At 0.44mm, it would take a bit longer. there have been lots of numbers thrown around as to what the pump should be set to, anywhere from 0.72m to 0.95mm. Which one should you use??? According to Volvo Supplement to Manual 30571/1, the pump should be set to 0.75mm for all cars equipped with an EGR system. Unfortunately my car might be missing some of the EGR system (??) so I'm not sure if I should still use this value... Manual 30571/1 gives the following values:

D24T Exc. USA/Canada 0.9mm
D24T USA/Canada '82-'83 0.8mm
D24T USA Federal/Canada '84- 0.85mm
D24T USA Calif. '84 0.75mm

If it wasn't such a pain to retime the pump, I would try a spread of values and post some feedback :/ BUT, I found this on a Dodge Ram website

Advancing the timing will...
  • Decrease exhaust temperature
  • Increase cylinder temperatures/pressures
  • Increase fuel economy
  • Increase your output of NOx
  • Decrease your output of Hydrocarbons
  • Increase the amount of black smoke at peak torque


FYI, the cold start device, when operating correctly, should increase the above measurements by 0.20-0.25mm. This gives you a quantitative test for you cold start mechanism.

I have started selling 1/8" I.D. X 1/4" O.D. biodiesel-compatible fuel line. It's more heat resistant than Tygon and has the perfect degree of flexibility. The plastic hose I put on after the pump rebuild cracked and dumped fuel down the side of the engine so polyethylene(translucent plastic) fuel line is definitely not a good idea for this application. At $3 a foot, it's 1/2 the cost of Viton and it comes in a cool translucent bright yellow color. You may send $$ for as many feet as you'd like + $4.05 USPS Priority shipping to mycoleptodiscus@yahoo.com via Paypal or email me for my home address to mail me a personal check.

Friday, August 04, 2006

We're Rolling!

After reinstalling the injectors and pump, it was time to prime the fuel system. I replaced the fuel filter (necessary if you ever need to claim any sort of warranty for your rebuilt pump) and applied a vacuum (evacuated freon container with air removed using a vacuum pump) to the pump return line (because it's at the top of th efuel system and any air will accumulate there) and pulled fuel SLOWLY through the system. I then cracked the injector lines at the injectors and turned the starter over a few times to get the air out of the injector lines. Yes, it's a little messy, but necessary. Started right up! Did throttle adjustments according to the manual and my idle is a bit high. More adjustments will come later. I guess the important thing is, after dropping $680, SoDak should be good for another 100,000 miles.

The interesting thing was that the three bolts that hold the pump bracket to the engine are responsible for adjusting the rear belt tension. After seeing firsthand the pump bushings worn on one side- the importance of proper belt tension comes to mind. Tension gauges are now on Ebay from ZDMak

I also learned that replacing the pump is actually really easy! If you can adjust the pump timing, you can do the pump. Speaking of pump timing, the timing tools bought from Germany actually work great- no problems. The other thing is that, unlike the front timing belt, if you screw up the job, you can't destroy your motor :)

Another thought- I am considering adding an intercooler. I have been looking at th eturbo piping from a "classic" SAAB 900 and it has a nice cast aluminum 90 deg. bend piece that might work perfectly... More later.

Thursday, July 13, 2006

Compression Revisited

Tested compression today again with a marginal gauge...
1-390psi
2-390psi
3- 370psi
4-390psi
5-390psi
6-390psi
Pretty good for 289,000 miles. The new gauge that I had bought was garbage. It. wouldn't hold pressure. Piece of garbage... Note: to do a compression test properly you need to remove all of the injectors.
I'll have to check the valve adjustment for #3 while I have everything apart.
I spent a good deal of time cleaning out the threads from cyl#5. Evidently I didn't have a good seal with the injector washer against the block. It was filled with carbon. It was a bear getting the injector out. I heard back from Diesel and Import service. My injectors are done and recalibrated. The spray pattern looked good so no new nozzles were necessary. $130. I gave them the go-ahead to do the injection pump. $550. Should be done next week.
A few part #'s
1257427- The rubber spacers that go underneath the injector line clamps
1328452- The short hose just towards th efirewall from the thermostat
9139507- The wax thermostat inside the cold start device (order it from Bosch if at all possible as it's almost $100 from Volvo)
The crank case breather (hose going from the top of the valve cover to the turbocharger) had rotted away and was dumping oil down onto the exhaust manifold. I ordered a new one from Volvo.

Tuesday, July 11, 2006

Volvo High Mileage Club


Get a neat mileage badge for your grille FREE from Volvo. Mail the enrollment form to...

Volvo High Mileage Club
P.O. Box 935
Langhorne, PA 19047-0935

Monday, July 10, 2006

More Tool stuff and Pump Shaft Seals


The Good:
The V5187 tool arrived today. Looks great. It's alot bigger than I thought it would be. I also got a bunch of paraphenalia from Baum on all of the wonderful tools they have (and a credit application). I got a lead on a pump gear holding tool that hopefully is a lot less expensive than the V5199, the AS4394. Baum carries all the standard pump timing tools. Lastly, they have a crank pulley wrench for 5-cyl VW/Audi that looks curiously like the Volvo tool...
www.baumtools.com
1-800-848-6657

The Bad
The pump shaft on my pump has too much play- will need new punp shaft bushings. :( The dude said that a new seal would work for a while, but then I'd be havin' the same problem. Now I need to decide whether to have the pump rebuilt... I need to take another look at the finances.

Thursday, July 06, 2006

Overhaul

Today I pulled the injector pump and pulled all of the injectors. I sent the injectors to Diesel and Import Service to be calibrated. I am going to bring the pump up to them and have them replace the pump shaft seal. They quoted $25 labor + the seal, not bad and my time's worth more than that. I was contemplating a full pump rebuild, but $550 was a little too rich for me. I home the shaft seal takes care of things.

I spent alot of time on the phone with a very helpful chap at the Volvo dealership. They seem to have just about everything. They even had replacements for the little rubber spacers that go in the injector line clamps. They even had parts for a 1950's PV444 are available from the dealer. What service! I can't even get parts for my '78 Bus from the VW dealer :/

I ordered the crankshaft pulley tool V5187 below. Only $60!! The camshaft sprocket tool was $110. I don't need it THAT bad.

Next week I'll be doing a compression test! We'll see what I find. Whahoo!

Wednesday, July 05, 2006

Bad News Folks...

I have always known that after I let SoDak sit for a day, she starts up with a little cough and sputter. I am assuming that she is losing prime/pressure in the injection pump. I also am assuming that this problem will be fixed by replacing the pump shaft seal. Lately, the problem had been getting a bit more severe with it taking several minutes (as opposed to several seconds) for the sputtering issue to resolve and lower power at all speeds is evident. Depending on a simple test, I will be pulling the pump and replacing the shaft seal. I will replace the fuel return line with a clear hose to see if air is being introduced at the shaft seal. I currently have the fuel supply hose as a clear piece of tubing and no air is being introduced there. If this confirms my suspicions, While I have all the injector pipes off, I might as well...
  1. Replace the injector nozzles and have the injectors recalibrated to the high side of their opening pressure
  2. Do a compression test (I did one before, but this was before I adjusted the valves- you need to remove all of the injectors to do this properly)
  3. Install Tygon fuel return lines (the little ones on the fuel injectors)

Saturday, July 01, 2006

Comments


I'm curious who (if anyone!) visits this site... Would you be so kind as to post a comment on this entry. I really have no idea if anyone visits this lonely corner of cyberspace. Thanks!

Tools!


I have found some rather elusive D24/D24T tools. See previous post for more info.
The first tool holds the crankshaft pulley while you torque (supposedly) the crankshaft bolt to over 300 ft. lbs. I had though this tool was unavailable... The part number is V5187 and it's made by Baum Tool.

Second tool holds the camshaft sprocket at the front of the engine while you tighten the waterpump to adjust the cam timing (front) belt tension. Baum V5199

There aloso seem to be some other interesting tools that I have not seen, e.g. the pump shaft seal puller...
Here's the link
Happy Wrenching!


Fuel Pump Function

Here is some information for those who would like to know how the Bosch fuel pump works. Yes, I'm missing a page. I'll get to it when I have time.

Sunday, June 25, 2006

Energy Fair

I just got back from the Midwest Renewable Enegy Association (MREA) Energy Fair. What fun! I had numerous comments on SoDak (Volvo diesels are not that common as you all know). I just wanted to share what a joy it is to drive this car on th freeway. The only car better was my old 1987 SAAB 900T. The turbo is your friend when passing on the highway :) It was very much a Biodiesel/Waste Vegetable Oil (WVO) event. I learned some new things, like Elsbett makes a single tank WVO conversion. Interesting... I tried to run my camp stove on biodiesel- Had done it twice before- with a different batch- and it was a miserable failure. There must be some variation in bio batches, something that doesn't make me all that comfortable...

Thursday, June 22, 2006

Power Power Power! (and a fix)

Removing that accelerator thing was amazing. SoDak now snaps my neck in all 4 gears when the auto tranny shifts. Sheesh! I disassembled, cleaned and reassembled injector #1 and found my leak still there!?! Turns out that the little rubber cap on the fuel return line had a crack in it and that was what was leaking. Oh well, it's fixed at least. Happy motoring again...

Saturday, June 10, 2006

Number One... Number One... Number One


Injector number 1 started leaking. I'll need to take the injector apart, check things out and retorque the halves together. Fun, fun, fun.

I also have been plagued by this stupit accelerator pedal stop that's mounted in an adjustable screw mechanism. It provides some sort of resistance where it 's harder to push the pedal below the stop. Anyway, it's a pain and the car would be better off without it. I've screwed it all the way in so it doesn't interfere with my life anymore.

Tuesday, May 30, 2006

ELI ELI ELI ELI ELI ELI Here it is!


Here's your part dude!
http://cgi.ebay.com/ebaymotors/Volvo-diesel-VW-oil-pump-83-86-D241-740-760-series_W0QQitemZ8070336091QQcategoryZ6778QQrdZ1QQcmdZViewItem
Good luck! Act Fast!

Wednesday, May 24, 2006

Good News on the Biodiesel Front!

Biodiesel News

Sunday, May 14, 2006

Overheating


Yesterday the throttle mechanism on the fuel pump wore a hole through the coolant hose coming from the car heater. My wife told me two days ago they she had seen a pool of coolant under SoDak, but I totally forgot about it :/ The temp gauge went sky high and I shut the motor off immediately and coasted to a stop at the side of the road. A picture for those of you who might wish to make it to the next freeway exit.

Hose only available from Volvo $58 Ouch!
Part #1328110

The old hose was some fabricated piece of you know what, hence the clearance issues. The new hose fits perfectly. It better for what Volvo charges!

Car still runs great, no problems.

Monday, April 17, 2006

Go figure. Carrot Top into Volvo Diesels...


Who would have known that the (in)famous comedian Carrot Top would be into Volvo diesels, but here he is pulling a D24 out of a Volvo 240! OK, actually, it's Eli, but I couldn't resist. He's looking for an Oil Pump Relief Valve. If anyone has one, give me an email.

"The valve is a 22Milimeeter bolt in close proximity to the oil filter. Actually it is on the same side of the engine and slightly in front of the oil filter. Unscrew this, you will remove the bolt, a washer, a spring and then the sought after piston. Really, i think it is just a small rod"

I'm going to pull mine and get the dimensions of the piston when I get a spare moment.

Saturday, April 15, 2006

German Pump Timing Tools Update

The pump timing tools from Ebay Germany arrived yesterday. I was not impressed. These are basically hand-machined, with macining marks still evident. They are not a mass-produced tool with nice, smooth surfaces throughout. It looks like they will work fine, but the tolerances for the plunger threads that go into the dial gauge are not perfect. My advice, stick with the ZD Mak models and just cut off the end of the lock pin.

U-Pull-R find

In a quest to find retractable seatbelts from a mid-90's VW Jetta for my '78 VW bus, I happened upon an '80 VW Rabbit Diesel! What luck! I pulled the fuel pump and four injectors + lines and $17 later I was off. Unfortunately, the one compatible Jetta had already had its front seatbelts taken :(

My intention is to use the pump as a practice for replacing the pump shaft seal. I also grabbed the woodruff key in case I lose mine one day. The injectors are the same as the Volvo so i will rebuild them with new nozzles and have them adjusted to the correct pressure by Diesel and Import Service in Blaine, MN. These are VERY helpful people. They tested the opening pressures on my injectors for free! They are a Bosch authorized diesel service center.

Wednesday, April 05, 2006

Manuels


Finally purchased a set of factory manuals! Items include...
  • Sunroof Repair and Reseal
  • Fault Tracing, Repairs, Maintainance, Engine
  • Fault Tracing, Repairs, Maintainance, Maintaianance Service
  • Design, Function
  • Reconditioning
  • Emission Controls
  • Fault Tracing, Repairs, Maintainance, Electrical System
  • Fault Tracing, Repairs, Maintainance, Radio
  • Fault Tracing, Repairs, Maintainance, wiring Diagrams
  • Fault Tracing, Repairs, Maintainance, Power Transmission
  • Reconditioning, Manual Transmission
  • Fault Tracing, Repairs, Maintainance, Suspension and Steering
  • Reconditioning, Power Steering gear, cam gear
  • Fault Tracing, Repairs, Maintainance, Springs, Shock absorbers, wheels
  • Fault Tracing, Repairs, Maintainance, Body Repairs
  • Fault Tracing, Repairs, Maintainance, Body fittings, Interior, Climate Control
  • Pocket Data Booklet
  • Brochure with part numbers for all manuals

Biodiesel "Back in the Saddle Again"

Minnesota is back blending biodiesel at 2% in all diesel fuel sold in the state after a brief hiatus this winter (see previous post) See this article in the St. Paul Pioneer press

Tuesday, March 28, 2006

240 Normally Aspirated to Turbo Conversion Kit


I found this kit for sale on Ebay Germany. Appears to be a Volvo factory item. Very interesting. Kit converts a non-aspirated Volvo 6 cyl. diesel to a turbodiesel. Complete with intercooler. Price... 500 Euros + shippin'

g.

Wednesday, March 22, 2006

More Volvo Tools


While perusing the Ebay Germany site, I found this nice set of pump timing tools. Note that the lock pin actually has the shallow head that is necessary for the tool to fit in between the pump and the firewall. VW's don't have this problem because the pump is at the front of the motor.
The whole set was $65 plus $20 shipping from Germany, an excellent deal in my opinion. I'll post more when the tools arrive and comment on their quality. Fortunately, I speak enough German to purchase items through Ebay.

Monday, March 20, 2006

Front Turn Signals

After putting it off for a long time, I finally fixed the front turn signals on the 740. They would go in and out because of HORRIBLY corroded bulb holders. For some reason, these seem to be prone to corrosion-water and/or salty water must have easy access. I just went to the local U-Pull parts place and got a couple turn signal bulb holders for $5 They just twist out. Make sure to put some silicon grease in the new bulb holder to avoid future problems (See previous post)

Napa has Valvoline Full synthetic 5W-50 on sale for $4.19 a qt! Whahoo.

Saturday, January 28, 2006

Biodiesel Chemistry


I have had quite a bit of conversation regarding biodiesel lately. I guess it would be appropriate to share some of it as some of you might have the same questions.

Q. At what temp will biodiesel plug my fuel filter?
A. This depends on what the biodiesel is made from. Biodiesel is made from oils/fats or triglycerides. On the right of the molecule is the glycerol and the three carbon chains attached to the glycerol are the fatty acids. Notice all bonds in the carbon chains are single bonds. This is called a saturated triglyceride. Bad stuff for your arteries and a solid at room temperature. Unsaturated triglycerides have one or more double bonds and tend to be liquids at room temperature. Biodiesel made from unsaturated oils, e.g. animal fats will form wax crystals at a lower tempterature than biodiesel made from saturated oils, e.g. canola oil.

Q. Can I use a diesel fuel treatment to prevent biodiesel from turning to jelly?
A. Companies such as Enertech and PowerService make fuel treatments for biodiesel. If you read carefully, even their best products either are designed to work on a blend of only B20 or their claims are only valid for plant-based biodiesel. How many of you know what type of oil your biodiesel was made from? The only guarantee you have is putting some fuel in a mason jar and use a thermometer and a freezer to figure out the temp where it starts to cloud up.
Q. How often do I need to change my fuel filter after I start using biodiesel?
A. I don't know. Always carry a spare fuel fiter and the tools to do the job in the trunk :) Pay attention for losses of power under acceleration.

Sunday, January 15, 2006

Tools, Tools, Tools


I don't know if any of these are still available from Volvo but...

1. Valve Depressor Tool, Volvo# 9995196 21This tool is used to depress the valves without impinging on the valve shim discs enabling removal and replacement when adjusting valve clearance. 
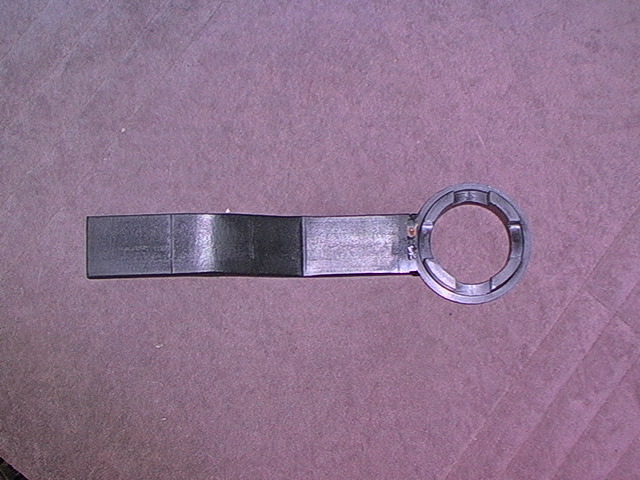
Necessary for adjusting valves. See previous posts for the Hazet version
2. Camshaft Sprocket Wrench, Volvo# 9995199 21This wrench is crucial for preventing the camshaft from moving when removing/replacing or adjusting the front or rear timing belts, or removing or replacing the camshaft front or rear sprockets. 
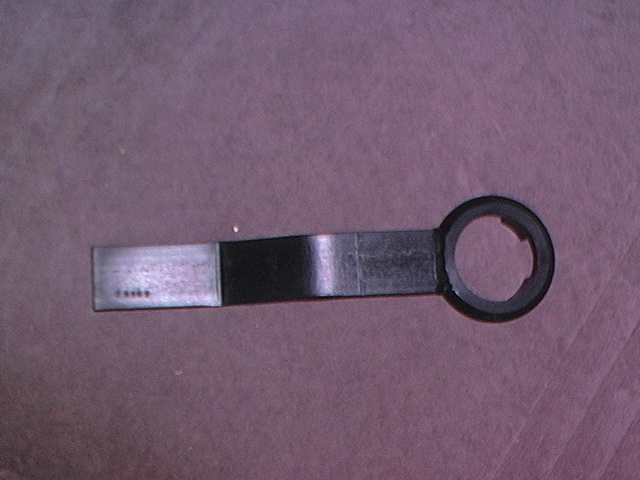
This would have been a great tool to have when I did this job.
3. Camshaft Rear Sprocket Bolt Wrench, Volvo# 9995201 21This wrench is used to gain access to the camshaft rear sprocket bolt when removing/replacing or adjusting the rear timing belt, or removing or replacing the rear camshaft sprocket. Note: I have not needed this tool to do the job.
4. Diesel Injection Pump Locking Pin, Volvo# 9995193 21Locking Pin crucial for securing Bosch diesel injection pump sprocket from rotating during R&R of cam shaft drive belt. This Locking Pin also assists in locating the general timing position of pump. Note: This pin looks shorter than the one typically sold for VW's and would probably be easier to get into the pump. On the VW, the injection pump is not against the firewall
5. Camshaft Locking Plate, Volvo# 9995190 21Used for securing the cam shaft from rotating and maintaining correct timing position during R&R of cam shaft drive belt. Easy to find this Tool
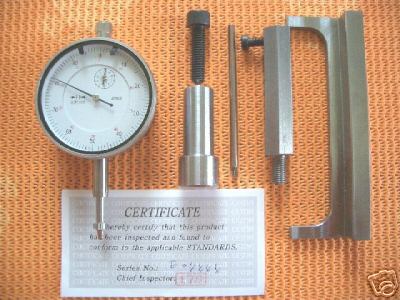
6. Diesel Injection Pump Dial Gauge Holder, Volvo# 9995194 23 Used for accurate adjustment of the Bosch diesel injection pump. This Dial Gauge Holder screws into the back of the injection pump and comes equipped with a 10cm dial indicator extension pin. Easy to find this Tool
7. Dial Indicator For use with the Injection Pump Dial Gauge Holder above. This is a precision instrument of high quality. Easy to find this Tool

Friday, January 06, 2006

Tachometer and a "Green" method of Biodiesel Production

Yesterday my tachometer decided that it would start working again :) Yahoo! I guess sometimes if you wait long enough, your car might fix itself... SoDak is still going strong and starting fine in sub-zero temps, but in desperate need of some front strut inserts.

GREEN CHEMISTRY
Biodiesel made with sugar catalyst(From the journal Nature)

The production of diesel from vegetable oil calls for an efficient solid catalyst to make the process fully ecologically friendly. Here we describe the preparation of such a catalyst from common, inexpensive sugars. This high-performance catalyst, which consists of stable sulphonated amorphous carbon, is recyclable and its activity markedly exceeds that of other solid acid catalysts tested for ‘biodiesel’ production. The esterification of higher fatty acids by liquid acid catalysts such as sulphuric acid (H2SO4) is a process commonly used for biodiesel production, but it involves high consumption of energy and the separation of the catalysts from the homogeneous reaction mixtures is costly and chemically wasteful. Recyclable solid acids, such as Nafion1–4, make better catalysts, although they are also expensive and their activity is less than that of liquid acids1. Sulphonated naphthalene carbonized at 200–250 C is a solid acid catalyst that has been used successfully for ethyl acetate formation5; however, it is a soft material and its aromatic molecules are leached out during liquid-phase reactions above 100 C or when higher fatty acids are used as surfactants, so its catalytic activity is rapidly lost. We have devised a strategy to overcome these problems by sulphonating incompletely carbonized natural organic material to prepare a more robust solid catalyst. Incomplete carbonization of natural products such as sugar, starch or cellulose results in a rigid carbon material that is composed of small polycyclic aromatic carbon sheets in a three-dimensional sp3-bonded structure. Sulphonation of this material would be expected to generate a stable solid with a high density of active sites, enabling a high-performance catalyst to be prepared cheaply from naturally occurring molecules. The scheme we use to sulphonate incompletely carbonized saccharides is shown in Fig. 1. First, D-glucose and sucrose are incompletely carbonized at low temperature to induce pyrolysis and the formation of small polycyclic aromatic carbon rings; sulphonite groups (–SO3H) are then introduced by sulphuric acid (see supplementary information). Structural analysis6–8 indicates that the prepared samples consist of sheets of amorphous carbon bearing hydroxyl and carboxyl (–OH and –COOH) groups, as well as high densities of –SO3H groups. This black powder is insoluble in water, methanol, benzene, hexane, N,N-dimethylformamide and oleic acid, even at boiling temperatures. It can be moulded into hard pellets or thin flexible films by heating with 0.5–5.0% by weight of binding polymer; the two forms have comparable stability and catalytic performance. The thin films act as electrically insulating proton conductors whose properties (0.09 siemens cm1 at 50 C and 100% humidity) are comparable to that of Nafion (0.1 siemens cm1 at 80 C). High-grade biodiesel is produced by esterification of the vegetable-oil constituents oleic acid and stearic acid. The activity of our solid sulphonated carbon catalyst in this reaction is more than half that of a liquid sulphuric acid catalyst and much higher than can be achieved by conventional solid acid catalysts (see supplementary information). There was no loss of activity or leaching of –SO3H during the process, even for samples subjected to repeated reactions at 80–180 C after having been recovered by simple decantation. The activity is double that of a carbonized sulphonated naphthalene catalyst tested previously5, which decreased rapidly on recycling at 80 C. Carbon catalysts identical to those described here have also been successfully produced from carbonized starch and cellulose (results not shown). Saccharide molecules may therefore be generally suitable for preparing these catalysts, which can be used as a replacement for liquid sulphuric acid in esterification reactions. In addition to biodiesel production, such environmentally benign alternative catalysts should find application in a wide range of other acid-catalysed reactions.

Saturday, December 24, 2005

More Winter Biodiesel Issues...


Mmmm waxy sludge...
http://www.thetrucker.com/showstory.aspx?id=10500
http://www.twincities.com/mld/twincities/13477163.htm

Washers and Wipers


Given the salty, slushy weather of late I decided to fix the windshield washers and replace the wipers. 20" or 21" front and 13" rear (remember, SoDak is a wagon) Buy the high quality Bosch microedge wipers! The washer system is a bit odd. The system utilizes 2 pumps-one for the front and one for the rear-and one reservoir. The pump motors are slid into rubber washers at the bottom of the tank. If your wiper reservoir is leaking, these rubber seals are a prime culprit. There is also a rubber washer around the black plastic filler neck as it goes into the tank. The fluid level sensor is grounded right next to the front right turn signal assembly. I found this ground to be heavily corroded and cleaned it, and all electrical connections.

Charging Problems Solved!

After replacing the alternator with a bosch rebuilt unit that turned out to be bad, I again replaced the alternator. I now have no charging issues! Note: the D+ terminal at the back of the alternator goes to the charge light on your dash. You should get ~14V DC at this terminal with the car running. The W terminal goes to your tachometer and is a pulsed DC signal. It should showed up on my multimeter as ~7.5V DC. FYI, the little plastic black box on the back of the alternator with one wire to the B+ terminal is a radio interference suppressor.

Tuesday, December 13, 2005

Running out of Fuel

I am embarrassed to say that I ran out of fuel yesterday. 378 miles on the trip odometer. My fuel gauge is not working very well. Luckily, I was stranded at a freeway exit with a diesel filling station. Lucky me. $11 and I was back on the road. I was very surprised at how little time it took the pump to prime (under a minute!) This is much less time than it takes my Jetta TDI, which I curse every time I need to change the fuel filter.

I was really amazed at the service I got. First a police officer stopped and asked how I was doing. I told him I had mechanical problems and that I had my tools in the back and I was going to tinker around a bit(Hint: you'll get a ticket for running out of fuel on the freeway). He said he'd be back in a while to check that I was alright. Then, 2 minutes later, a "highway helper" parked in back of me and put on his light bar while I fueled up SoDak. What service!

Friday, December 09, 2005

Alternator Contd. Contd.

According to the 740 manual I have, a voltage drop at the battery(measure voltage across battery with no load and with load - headlights, rear defrogger, blower fan on high- and compare) should be no more than 0.7 V. My measurements were 14.2V with no load and 13.3V with the above accessories on, for a voltage drop of 0.9V. I was concerned, but my friend Stew said that this was completely normal given the temperature (8F) and my 55A alternator.

Next I checked for voltage drop in both the power circuit (measure voltage between alternator + and battery + with load/no load and compare) and the ground circuit (measure voltage between alternator ground and battery - with load/no load and compare) I found a voltage drop in the ground circuit that was slightly more than the allowable 0.4V

I was lazy and just ran a redundant ground from the alternator housing directly to the negative battery cable.

The charge light was still on! Stew suggested we unplug the spade connector at the back of the alternator (red wire) and if the charge light went off the alternator was a bad unit. It went out. BAD rebuilt Bosch alternator :( I'm glad that I'm working on a Volvo where the alternator is easily accessible!

Wednesday, December 07, 2005

Front End Work, Starter Issues, Cold Starting, Heat...

Well, my starter started acting up. The small gear that pops out and engages the flex plate (kind of like a flywheel, but for auto trabsmission cars) is sticking when the temp is below zero :( My temporary solution is to just quickly flick the key 2X so as to "unstick" the gear and then start it.

The Volvo continues to start fine in sub-zero (-8F) weather without an electric heater. On the first starting attempt, it runs for 10 seconds and kills. On the second attempt, it starts and stays running. Because of the fact that the engine actually starts (initially) better than my 2000 Jetta TDI, this again points to a fuel issue and not a compression issue. The fuel is igniting just fine.

What I love most about this car is the heat. It's incredible! The TDI takes 15 minutes to warm up and provide decent heat in below zero weather. The Volvo is warm in 3 minutes and the heater is quite substantial. I can even drive to work in my Birkenstocks.

Today I finished repairing the engine wiring harness and did the RF ball joint and tie rod end. Thank God for my friend Stew and his import shop. I get to work inside in comfortable 60 or so degree heat.

Saturday, December 03, 2005

Let it Snow


Having had a chance to try out the Viking snow tires lately, they are excellent so far. The snow traction is on par with the Michelin Arctic Alpin and Bridgestone Blizzak WS-50's I have owned and driven. We haven't had much ice, but they are great on packed and fresh snow. I will update y'all on their wear characteristics and how they perform on ice.

Alternators Contd.


I replaced the alternator with a rebuild Bosch unit. The charge light is still on :( as are all of the dash lights on the right side of the instrument cluster. Hmmm. I checked the voltage coming from the alternator. A-OK I then repaired some of the deteriorating engine wiring harness. It seems as if a previous owner had spliced in a replacement 8-pin wiring harness plug(the one on top of the driver's side wheel well). They did a horse-sh*t job of it. They just used butt connectors and wrapped the whole thing in electrical tape. I removed the 8 pin plugs and just joined the wires. I used butt connectors cut off the plastic insulation, soldered the butt connectors and the put 3M shrink tubing over the connection.

I still have to track down what is causing the charge light to come on. My tachometer is still not working despite having confirmed a signal at the alternator using a digital scope.

In short (pun intended), I most likely have a wiring issue or a ground issue, but for now, SoDak is back on the road.

Tuesday, November 29, 2005

Alternator Altercations

I replaced the voltage regulator(pics of old one to come) on the alternator with a used one today. I also cleaned the electrical contacts on the alternator, including the slip rings and contact points for the voltage regulator. I noticed that a wire on a terminal on the alternator had broken. Could this be my issue? Alas, no. It was signal wire for the tachometer. Yes, the tachometer signal comes from the alternator, a good reason why you need the diesel 55A alternator and can't put one from a gasser Volvo in it. Anyway, after reconnecting the tach wire, the tach signal is still in and out. This, coupled with the fact that the alternator is still not charging with a known good used regulator, would point to a bad alternator :( In addition, the alternator has the original Volvo sticker on it, a sign that it it is probably original and has never been rebuilt. Looks like I'm in the market for a rebuilt alternator...

Jerry, I have not had any issues with this. The pulley you mention, is it the crank pulley or the sheeve (attached to the alternator) send a picture? I am a little bit confused by what you mean.

Monday, November 28, 2005

SoDak is Possessed


I drove to work today and noticed the lights getting a bit dim... turns out that the battery was basically dead. About 1 mile from work, the radio started going off and on with the turn signals, windshield washer and whatever else required current. For some reason I was led to put the battery charger in the back seat a couple of days ago. Providence? I've been living on borrowed time as the alternator light has been on for a few weeks, well now that I think of it, over a month. I guess now I actually have to deal with the problem.

The alternator light has been doing everything from pulsing with the engine rpm to being on all the time to being off all of the time. Hmmmm

I decided to first address the grounds. I cleaned them off, put a star washer under them and retightened. The star washer makes a nice positive electrical contact. No improvement. 12.7V with engine off, 12.6V with engine on. If the alternator is charging, the voltage will be arounf 14V with the engine running. Bummer. I am predicting a bad voltage regulator/brush pack on the back of the alternator. I'll keep you posted.